To stop IPTV buffering, adjust your app’s video buffer size to match your internet speed. For internet connections under 25 Mbps, set a 10-second buffer. For speeds over 50 Mbps, a 3-second buffer works best. Switching to an Ethernet connection, enabling hardware acceleration, and setting up Quality of Service (QoS) on your router will also drastically improve playback stability.
You have fast internet, a premium IPTV subscription, and a highly capable streaming device. Yet, your stream still pauses, stutters, and buffers right in the middle of a big game or a crucial movie scene.
Most users immediately blame their provider or call their internet service provider (ISP) to complain. However, the real fix usually sits quietly inside your streaming app’s settings menu. Buffer settings represent one of the most overlooked and highly impactful tweaks any IPTV user can make. Adjusting these parameters changes how your app processes incoming video, effectively smoothing out the rough edges of your home network.
This guide will explain exactly what buffering is, why it disrupts your viewing experience, and how to optimize buffer settings on every major app and device to eliminate playback issues permanently. For those using premium services, like iptv canada subscribers running Hot Player Pro, we will also explore how advanced buffer management built directly into the app handles these hurdles automatically.
What Is Buffering and Why Does It Happen?
To fix buffering, you first need to understand how a buffer actually works. In plain language, a buffer is a small amount of video data pre-loaded ahead of the exact second you are currently watching.
Think of it like filling a glass of water before you take a drink. The glass acts as your buffer. If someone pours water into the glass slightly slower than you drink, the glass will eventually empty, and you have to stop drinking to let it refill. When you stream live television, your app downloads a few seconds of video into your device’s memory to act as a cushion. When your internet speed temporarily dips, the buffer keeps the video playing smoothly until the connection stabilizes.
Why buffering occurs
Buffering happens when the pre-loaded video runs out before your internet connection can download the next segment. This depletion occurs for a few primary reasons:
- Your internet speed temporarily drops below the bandwidth required by the stream.
- The host server sends data too slowly to keep up with your playback.
- Your device processor struggles to decode the high-resolution video stream fast enough.
Settings vs. Internet vs. Server Buffering
Not all buffering issues stem from the same root cause. Understanding the difference prevents you from wasting time on the wrong fix.
- Settings buffering: This happens consistently. You will usually notice it at the start of a stream or immediately after switching channels. It means your app is configured poorly for your device hardware.
- Internet buffering: This happens randomly and frequently during peak neighborhood internet usage hours (like 8 PM on a weeknight).
- Server buffering: This affects all users simultaneously. If a provider’s server is overloaded, your VPN or local network tweaks will not fix it.
Buffer optimization only resolves buffering related to local settings and minor internet fluctuations.
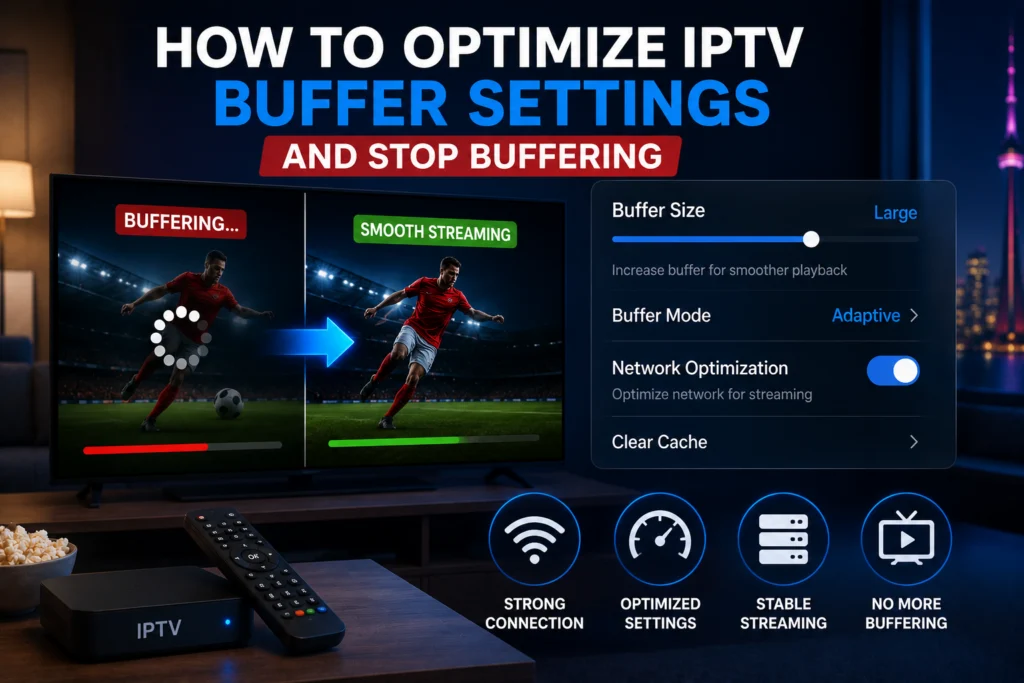
How Do Buffer Settings Work in IPTV Apps?
Buffer size dictates how much video data the app downloads ahead of your current playback position.
A small buffer uses less device memory and allows for incredibly fast channel switching. However, it leaves your stream highly vulnerable to brief internet dropouts. Conversely, a large buffer provides highly stable playback during internet speed fluctuations. The downside is that larger buffers require slower channel load times and consume significantly more device memory.
The default buffer setting in your app is rarely optimal. Developers design default settings for average, theoretical conditions rather than your specific internet speed and device hardware. If the default buffer is too small on a congested connection, you will face constant interruptions. If the default buffer is too large on a low-memory streaming stick, the app may crash or become totally unresponsive.
Different apps measure buffers differently—some use seconds of video, while others calculate megabytes of data stored. Your goal is to find the sweet spot for your specific connection speed, device capabilities, and provider.
How to Optimize Buffer Settings in TiviMate
TiviMate stands out as one of the most popular IPTV players available, but its default settings often need tweaking.
To find the buffer settings in TiviMate, navigate to Settings > Player > Buffer Size.
Recommended TiviMate Buffer Sizes by Internet Speed
- Under 25 Mbps: Set buffer to Small or Medium (roughly 10 to 15 seconds).
- 25 to 50 Mbps: Set buffer to Normal (5 to 10 seconds).
- Over 50 Mbps: Set buffer to None or Small (3 to 5 seconds). Fast connections refill data instantly and need less pre-loading.
A larger buffer is not always better on TiviMate. Expanding the buffer uses more Random Access Memory (RAM). Older Amazon Firesticks and budget Android boxes will crash if you force them to hold too much video data in their limited memory.
Additional TiviMate player settings
Hardware acceleration: You should generally enable hardware acceleration (AMLogic or MediaTek depending on your device) for smoother HD and 4K decoding. This offloads the heavy lifting of video decoding from your device’s CPU to its dedicated graphics processor (GPU). If you experience black screens or app crashes on an older device, disable hardware acceleration to see if stability improves.
Player type selection: TiviMate allows you to choose between ExoPlayer, MX Player, and VLC. ExoPlayer is the recommended default and handles most streams perfectly. If you encounter problematic streams without audio, try switching to MX Player or VLC as a fallback.
How to Optimize Buffer Settings in IPTV Smarters Pro
IPTV Smarters Pro offers precise control over how much video your device caches. To adjust this, navigate to Settings > Player Settings > Buffer Time.
Recommended Buffer Time Settings in Smarters Pro
- Unstable connection: 5000ms to 10000ms (5 to 10 seconds).
- Stable connection: 2000ms to 5000ms (2 to 5 seconds).
- Very fast, stable connection: 1000ms to 2000ms (1 to 2 seconds).
The buffer time number in Smarters represents milliseconds of video pre-loaded.
You should also check the hardware decoder setting in Smarters Pro. Enable the hardware decoder for smooth HD and 4K playback. Disable it immediately if your streams show green artifacts or wildly distorted colors. If streams freeze entirely, you can easily change the media engine from the Built-in player to ExoPlayer or MX Player right from the settings menu.
How to Optimize Buffer Settings in Hot Player Pro
Hot Player Pro is a premium application exclusively available to iptv canada subscribers. Unlike generic players, the buffer management in Hot Player Pro is pre-optimized specifically for our iptv‘s server infrastructure.
Hot Player Pro utilizes automatic adaptive buffering. The app constantly monitors your connection speed and adjusts the buffer size in real time. This requires far less manual configuration compared to TiviMate or Smarters.
Manual Buffer Adjustment
If you need to make manual changes, go to Settings > Playback > Buffer Size.
- Standard home connection: Leave on the automatic adaptive setting.
- Slower or unstable connection: Increase the buffer to the maximum stable setting.
- Very fast connection: Reduce the buffer manually to enable lightning-fast channel switching.
Hot Player Pro Exclusive Features
Hot Player Pro includes advanced features that actively prevent buffering before it starts. Adaptive bitrate switching automatically drops the video quality during sudden internet speed drops rather than freezing the picture entirely. The smart reconnect feature automatically reconnects dropped streams without requiring you to back out of the channel. These features drastically reduce playback interruptions for iptvcad subscribers.
How to Optimize Buffer Settings in IBO Player
IBO Player is a highly popular choice for Smart TV users. Find the buffer controls by opening Settings > Playback Settings > Buffer Configuration.
For a standard home connection, a 5-second buffer works perfectly. Increase this to 10 seconds if you experience regular frame drops or stuttering.
Smart TV processors vary wildly in power. A brand new LG OLED handles video data much faster than a five-year-old budget Samsung model. Because of these processor limitations, Smart TVs generally require slightly larger buffer sizes than dedicated Android boxes. Always match your resolution output settings to your TV’s native resolution to prevent the processor from wasting resources upscaling or downscaling the image.
How to Optimize Buffer Settings in VLC and Kodi
VLC Buffer Optimization
VLC is a powerhouse for desktop users. To adjust its buffer, go to Tools > Preferences. At the bottom left, select Show All. Navigate to Input/Codecs.
Scroll down to the Advanced section to find the Network caching (ms) value. The default is usually 1000ms. Increase this to 2000ms or 3000ms for unstable IPTV streams. For extremely fast and stable PC connections, you can reduce this to 500ms so streams launch instantly. Remember to click Save so your settings persist after closing VLC.
Kodi Buffer Optimization
Kodi does not feature a simple buffer slider in its standard menus. Adjusting the buffer requires creating or editing a file called advancedsettings.xml.
You must add specific string values like buffermode, cachemembuffersize, and readbufferfactor to dictate how Kodi handles network data. Formatting this XML file incorrectly will break Kodi completely, so always back up your current setup before making changes. A simpler and safer alternative is to use third-party maintenance tools, like the Ares Wizard, which calculate your device’s available RAM and inject the correct XML buffer settings automatically.
Device-Specific Buffer Optimization Best Practices
Your streaming device dictates how aggressive your buffer settings can be.
Amazon Firestick
Firesticks possess limited RAM. Aggressive, large buffer settings will absolutely cause the device to crash back to the home screen. The recommended maximum buffer for a Firestick is 5 to 8 seconds. Always free up RAM before streaming by force-stopping unused background apps in the Firestick settings menu. Older 1st and 2nd generation models struggle significantly more than the newer Firestick 4K Max.
Android TV Box
Dedicated Android TV boxes are the most flexible devices for buffer optimization because they usually feature ample RAM. Higher-end boxes with 4GB of RAM or more can safely use massive buffer settings. Budget boxes with 1GB to 2GB of RAM should keep buffer settings conservative.
Smart TV (Samsung and LG)
Native Smart TV IPTV apps offer less control over backend buffer settings than Android applications. We highly recommend using IBO Player for the best buffer management on Tizen and WebOS systems. Smart TVs benefit greatly from regular device restarts to clear the system cache and free up system memory before heavy weekend streaming sessions.
Windows PC
Desktop and laptop computers boast the most RAM of any streaming device, allowing buffer settings to be set much higher. Because of this massive hardware advantage, PC users utilizing VLC or TiviMate rarely experience buffer-related crashes.
Network-Level Optimization to Reduce Buffering
Settings inside your app only take you so far. Optimizing your local network improves buffer performance across all apps and devices simultaneously.
Use Ethernet Over Wi-Fi
Wired Ethernet connections provide vastly more consistent data throughput than wireless connections. Wi-Fi packet loss forces your IPTV buffer to run out unpredictably. If you plug in an Ethernet cable and the buffering instantly stops, Wi-Fi interference was your culprit all along.
Quality of Service (QoS) Router Settings
Quality of Service (QoS) is a router feature that prioritizes specific internet traffic over other devices on your network. Access your router’s admin panel and enable QoS. Set your specific IPTV device’s MAC address as the highest priority. QoS proves exceptionally effective in busy households where someone downloading a large file or playing online games might otherwise steal bandwidth from your live stream.
Change Your DNS Settings
Slow Domain Name System (DNS) resolution adds latency that starves your buffer of data. The default DNS servers provided by ISPs are often slow and unreliable. Change your router’s DNS settings to Google DNS (8.8.8.8) or Cloudflare (1.1.1.1). Doing this at the router level automatically improves the connection for your Firestick, Android box, and Smart TV.
Router Placement and Channel
If you must use Wi-Fi, place your router in a central, elevated location. Avoid placing it on the floor or hiding it behind thick furniture. Use a Wi-Fi analyzer app to scan for local interference and change your router’s broadcasting channel to the least congested option. Always connect your IPTV device to the 5GHz Wi-Fi band rather than the slower 2.4GHz band, provided your streaming device is in the same room as the router.
Restart Your Router Weekly
Routers accumulate memory errors and IP assignment conflicts over weeks of continuous operation. A simple weekly restart clears the routing table and significantly improves sustained throughput performance.
When Buffer Settings Are Not the Problem
No buffer setting in the world compensates for a problem originating outside your local setup. Stop tweaking your app settings if you face any of the following external issues.
Insufficient Internet Speed: Run a speed test on your device exactly when the buffering occurs. If your download speed plummets below 15 Mbps, your bandwidth is genuinely insufficient for high-bitrate live streaming. You must upgrade your internet plan or manually reduce the stream quality in your app.
ISP Throttling: Some internet providers intentionally slow down IPTV traffic. Buffer settings cannot overcome intentional ISP throttling. To confirm this, turn on a premium VPN. If the VPN immediately fixes the buffering, your ISP was actively throttling your connection.
Overloaded Provider Servers: Buffer settings cannot fix an underpowered server. If multiple channels buffer simultaneously, or if the buffering only happens during massive sporting events, the server cannot handle the user load. Contact your provider’s support team or consider switching. iptv canada operates high-capacity servers specifically engineered to handle peak-hour demand without server-side buffering.
Step-by-Step Buffer Optimization Checklist
Follow this checklist from top to bottom to systematically eliminate buffering:
- Identify the type of buffering (is it a settings issue, internet drop, or server overload?).
- Run a speed test directly on your streaming device to confirm adequate bandwidth.
- Switch your device from Wi-Fi to a hardwired Ethernet connection.
- Enable hardware acceleration within your IPTV app’s player settings.
- Adjust your buffer size based on your internet speed (10 seconds for slow connections, 3 seconds for fast ones).
- Switch the internal player type (e.g., from Built-in to ExoPlayer) if the current one stutters.
- Enable QoS on your router and set your streaming device as the highest network priority.
- Change your DNS servers to Google (8.8.8.8) or Cloudflare (1.1.1.1).
- Clear your IPTV app cache and fully restart your streaming device.
- Test the stream during peak hours (like 8 PM on a weeknight) to confirm the optimization worked.
How to Test if Your Buffer Optimization Worked
Do not assume the problem is fixed just because a channel loads smoothly at 2 PM on a Tuesday.
Peak hour test: Stream heavily at 8 PM on a weeknight. This is when neighborhood network congestion is highest. Compare the playback stability to how it performed before your optimizations.
Channel switch speed test: Rapidly switch between 10 different high-definition channels. Note exactly how quickly each channel loads. On a well-configured setup, each channel should populate in under 3 seconds.
Sustained stream test: Leave a single live channel running for two full hours without touching the remote. Count any buffering interruptions. Zero to one brief pause is an acceptable baseline; anything more indicates that further optimization is required.
Next Steps for a Buffer-Free Experience
Buffering remains one of the most fixable problems in the streaming world. The solution almost always lies inside your local app settings, your home network environment, or the physical limitations of your device. By starting with the checklist provided above, most users can resolve their severe buffering issues after executing just the first five steps.
Remember that buffer settings perform best when paired with an app optimized for your specific device. If you want to bypass manual configurations entirely, explore premium options. Subscribers using Hot Player Pro through iptvcad benefit from adaptive buffer management that handles network fluctuations automatically.
If you have optimized every local setting, hardwired your connection, and still experience constant playback issues, the problem stems from your current provider’s server capacity. Try iptvcad with a free trial and experience the massive difference that high-capacity, localized servers make to your viewing stability.
Frequently Asked Questions (FAQ)
What is the best buffer size for IPTV?
The best buffer size depends heavily on your internet speed. If your internet is slower than 25 Mbps, choose a larger buffer of 10 to 15 seconds. If your internet speed exceeds 50 Mbps, a smaller buffer of 2 to 5 seconds provides stable playback while allowing for much faster channel switching.
How do I stop IPTV from buffering?
To stop buffering, first hardwire your device to your router using an Ethernet cable. Next, open your IPTV app settings and increase the video buffer size. Finally, ensure you have enabled hardware acceleration in your app’s player settings to help your device decode video faster.
What is hardware acceleration on IPTV?
Hardware acceleration forces your device’s dedicated graphics processing unit (GPU) to decode the video stream instead of relying on the general central processing unit (CPU). Enabling this feature results in drastically smoother playback, especially for high-bitrate HD and 4K channels.
How do I change buffer settings in TiviMate?
Open the TiviMate app and navigate to Settings. Click on Player, then scroll down to find Buffer Size. You can adjust the buffer from None up to Very Large depending on your network stability and device memory limits.
How do I fix buffering in IPTV Smarters?
Open IPTV Smarters Pro and go to Settings. Select Player Settings and locate the Buffer Time option. Increase the buffer time to 5000ms or 10000ms if your streams are constantly pausing. Additionally, ensure the Hardware Decoder is enabled in the same menu.
Does a larger buffer always fix IPTV buffering?
No. A larger buffer prevents buffering caused by minor internet speed dips, but it requires significantly more device memory. Setting a massive buffer on an older, low-memory device like an early generation Firestick will actually cause the app to crash entirely.
What is QoS and does it help with IPTV buffering?
Quality of Service (QoS) is a setting inside your Wi-Fi router that allows you to prioritize specific devices or types of internet traffic. Enabling QoS and prioritizing your streaming device prevents other devices in your home (like a laptop downloading a large file) from stealing the bandwidth needed for your live stream.
Why does my IPTV buffer even with fast internet?
If your internet speed is fast but buffering persists, you may be experiencing severe Wi-Fi packet loss, your ISP might be actively throttling your connection, or your IPTV provider’s host servers are overloaded. Try using an Ethernet cable and a VPN to rule out local network and ISP throttling issues.
How do I optimize IPTV on a Firestick?
Because Amazon Firesticks have limited RAM, keep your buffer settings conservative (between 3 and 5 seconds). Always clear the cache of your IPTV app and force-stop all unused background applications in the Firestick system settings before launching your live TV streams.
What is the best player setting for IPTV Smarters Pro?
The best player setting for IPTV Smarters Pro is generally the built-in ExoPlayer combined with the Hardware Decoder turned on. If you experience streams with no audio or freezing video, switch the media engine to MX Player in the settings menu as a reliable fallback.